

How I Built This Blog: A Next.js + MDX Journey
Creating a modern, high-performance blog requires balancing technical complexity with content management simplicity. In this article, I'll walk through how this very blog you're reading was built using Next.js, MDX, and various React components. Whether you're a developer looking to build your own blog or just curious about what's running behind the scenes, this breakdown will give you an inside look at the architecture, features, and technical decisions.
The Tech Stack Overview
At its core, this blog uses:
- Next.js: The React framework for production
- TypeScript: For type safety across the codebase
- MDX: Markdown with JSX for rich content authoring
- Tailwind CSS: For styling and responsive design
- Supabase: For the hit counter feature and data storage
- React: Component library for UI building
This combination provides a powerful foundation that offers excellent developer experience, content management simplicity, and optimal performance for readers.
Blog Architecture
The blog follows a hybrid rendering approach, leveraging both static generation and client-side interactivity where appropriate. Here's how it's structured:
1. Content Management with MDX
All blog posts are written as .mdx files stored in the app/blog/posts/ directory. MDX is an extension of Markdown that allows embedding React components directly in content, giving the best of both worlds:
- Simple, clean content authoring with Markdown
- Rich interactive components when needed
Each post starts with frontmatter metadata:
---
title: "How I Built This Blog: A Next.js + MDX Journey"
description: "A deep dive into how this blog is built..."
date: "2025-10-03"
category: "Web Development"
tags: ["Next.js", "MDX", "React", "TypeScript"]
keywords: ["Next.js blog tutorial", "MDX blog"]
youtubeId: "optional-youtube-video-id"
author: "Joshua Clarke"
---
This metadata is used for SEO, categorization, and display purposes throughout the site.
2. Static Generation Pipeline
The blog leverages Next.js's static site generation capabilities for optimal performance:
- At build time, the
lib/blog.tsfile reads all MDX files from the posts directory - It parses frontmatter metadata and content using
gray-matter - For the blog index page, it creates summaries without the full content
- For individual post pages, it imports the MDX components dynamically
This approach ensures fast page loads while keeping the content easily maintainable as separate files.
3. Dynamic Features
While the core content is statically generated, the blog includes several dynamic features:
- Hit Counter: Tracks post views using a Supabase backend
- Share Functionality: Dynamic social sharing features
- Table of Contents: Automatically generated from post headings
- Code Syntax Highlighting: Applied client-side with dynamic copy buttons
- Related Posts: Calculated based on categories and tags
These features enhance the reading experience without sacrificing the core performance benefits of static generation.
The Rendering Process
When you request a blog post, here's what happens behind the scenes:
- Server-Side Rendering: Next.js statically generates the page HTML
- MDX Processing: The MDX content is processed and converted to React components
- Component Hydration: React hydrates the page on the client for interactivity
- Dynamic Features: Client-side JavaScript enhances the page with features like the hit counter
This process ensures the fastest possible initial load while still providing rich interactivity.
Here's a simplified version of how a blog post page is structured:
export default async function BlogPostPage({ params }) {
  const { slug } = params;
  const post = getBlogPostBySlug(slug);

  if (!post) {
    notFound();
  }

  // Import MDX component dynamically
  let MDXComponent = null;
  try {
    const mod = await import(`../posts/${slug}.mdx`);
    MDXComponent = mod.default;
  } catch {
    // Fallback to HTML rendering if MDX import fails
  }

  // Get related posts
  const relatedPosts = getRelatedPosts(slug, 3);

  return (
    <>
      {/* SEO structured data */}
      <Script type="application/ld+json">
        {JSON.stringify(generateArticleStructuredData(post))}
      </Script>

      <div className="min-h-screen bg-slate-900 text-white">
        <Navbar />
        <BlogPostClient
          post={post}
          relatedPosts={relatedPosts}
          content={<MDXComponent />}
        />
        <Footer />
      </div>
    </>
  );
}
Performance Optimizations
To ensure a fast, responsive experience for readers, several performance optimizations are implemented:
1. Static Generation
By using Next.js's static generation, most of the HTML is pre-rendered at build time, resulting in extremely fast page loads.
2. Image Optimization
Next.js's Image component automatically optimizes images, serving them in modern formats like WebP, with proper sizing for different devices:
<Image
  src={post.image}
  alt={`Hero image for ${post.title}`}
  fill
  className="object-cover"
  sizes="(min-width: 1280px) 1024px, (min-width: 768px) 80vw, 100vw"
/>
3. Code Splitting
React components are code-split and loaded only when needed, reducing the initial JavaScript bundle size:
// Dynamic imports for code splitting
const loadHighlightJS = async () => {
  const hljs = (await import('highlight.js')).default;
  // Apply syntax highlighting
};
4. SEO Optimization
Every post includes rich structured data to enhance search engine visibility:
- Article schema
- Breadcrumb navigation
- VideoObject schema (for posts with YouTube videos)
- LearningResource schema (for educational content)
This helps search engines understand and properly index the content, improving visibility in search results.
Feature Spotlight: The Hit Counter
One of the unique features of this blog is the retro-inspired hit counter. Let's look at how it works:
Backend Implementation
The hit counter uses Supabase as a backend database to track post views:
- A
post_hitstable stores the view count for each post by slug - An API route (
/api/hit-counter) handles incrementing and retrieving counts - Row-Level Security ensures only authorized calls can modify the count
Here's a simplified version of the API route:
export async function POST(req: NextRequest) {
  const { slug } = await req.json();

  // Check if post exists in our hits table
  const { data: existingPost } = await supabase
    .from(HITS_TABLE)
    .select('hits')
    .eq('slug', slug)
    .single();

  if (!existingPost) {
    // If post doesn't exist, create it with 1 hit
    await supabase
      .from(HITS_TABLE)
      .insert({ slug, hits: 1 });

    return NextResponse.json({ hits: 1 });
  } else {
    // If post exists, increment hit count
    const { data } = await supabase
      .from(HITS_TABLE)
      .update({ hits: existingPost.hits + 1 })
      .eq('slug', slug)
      .select('hits')
      .single();

    return NextResponse.json({ hits: data?.hits || existingPost.hits + 1 });
  }
}
Frontend Component
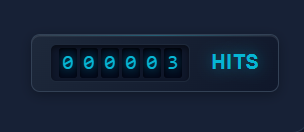
The frontend component displays the count with a retro-inspired LCD display:
- When a post loads, the component sends a request to increment the hit counter
- The counter displays the current hit count with an animation
- The display updates in real-time when the count changes
This creates a nostalgic yet functional feature that gives readers insight into post popularity.
Content Authoring Experience
Writing blog posts is straightforward thanks to MDX:
- Create a new
.mdxfile in theapp/blog/posts/directory - Add frontmatter metadata at the top
- Write content using standard Markdown syntax
- Add React components when needed for enhanced functionality
For example, embedding a YouTube video is as simple as:
<YouTubeEmbed videoId="KAQ6Nb2mmhQ" title="Windows Sandbox Tutorial" />
This approach strikes the perfect balance between ease of authoring and rich functionality.
Design Philosophy
The blog's design follows a few key principles:
- Content First: Typography and layout prioritize readability
- Dark Mode: A dark theme reduces eye strain and looks modern
- Responsive Design: The layout adapts seamlessly to all screen sizes
- Subtle Motion: Animations add life without being distracting
- Accessible: Proper semantic HTML and ARIA attributes ensure accessibility
These principles create a pleasant reading experience regardless of device or browsing context.
Deployment and Continuous Integration
The blog is deployed on Vercel, which provides:
- Automatic deployments on git push
- Preview deployments for pull requests
- Edge caching for optimal global performance
- Analytics and monitoring
This setup ensures that publishing new content is as simple as committing a new MDX file to the repository.
Lessons Learned
Building this blog taught me several valuable lessons:
- Start Simple: Begin with core functionality and add features incrementally
- Static First: Generate as much as possible at build time for performance
- Component Abstraction: Create reusable components for consistent design
- Content Strategy: Plan your content structure before building features
- Performance Budget: Always measure performance impact when adding new features
These principles can apply to any content-focused web project, not just blogs.
Future Enhancements
The blog is always evolving. Some planned future enhancements include:
- Comments System: Adding a community discussion feature
- Improved Analytics: More detailed content performance metrics
- Content Series: Better organisation for multi-part content
These features will further enhance the reading experience while maintaining performance.
Conclusion
Building a modern blog with Next.js and MDX offers the best of both worlds: developer experience and content management simplicity. This architecture provides a solid foundation that can evolve with changing needs while maintaining excellent performance.
The combination of static generation for performance with client-side enhancements for interactivity creates an optimal reading experience. Whether you're looking to build your own blog or just curious about web technologies, I hope this breakdown gives you some insight into modern web development practices.
Resources
Want to see more content? Consider subscribing to my newsletter for updates on new articles and tutorials.


